Tunnel
This doc covers the why, where and how the tunnels are used in Ori.
What is tunnel?
A tunnel allows you to create a PORT forwarding connection from your machine to any remote server that you can connect to via ssh.
It allows you to essentially assign a temporary domain to your local development environment which is useful while building app/services that required a callback URL to work.
For Example
- It is used in local whatsapp development
- Any channel integration generally expects a working callback domain to send messages, notifications and other webhooks.
We have two types of tunnels
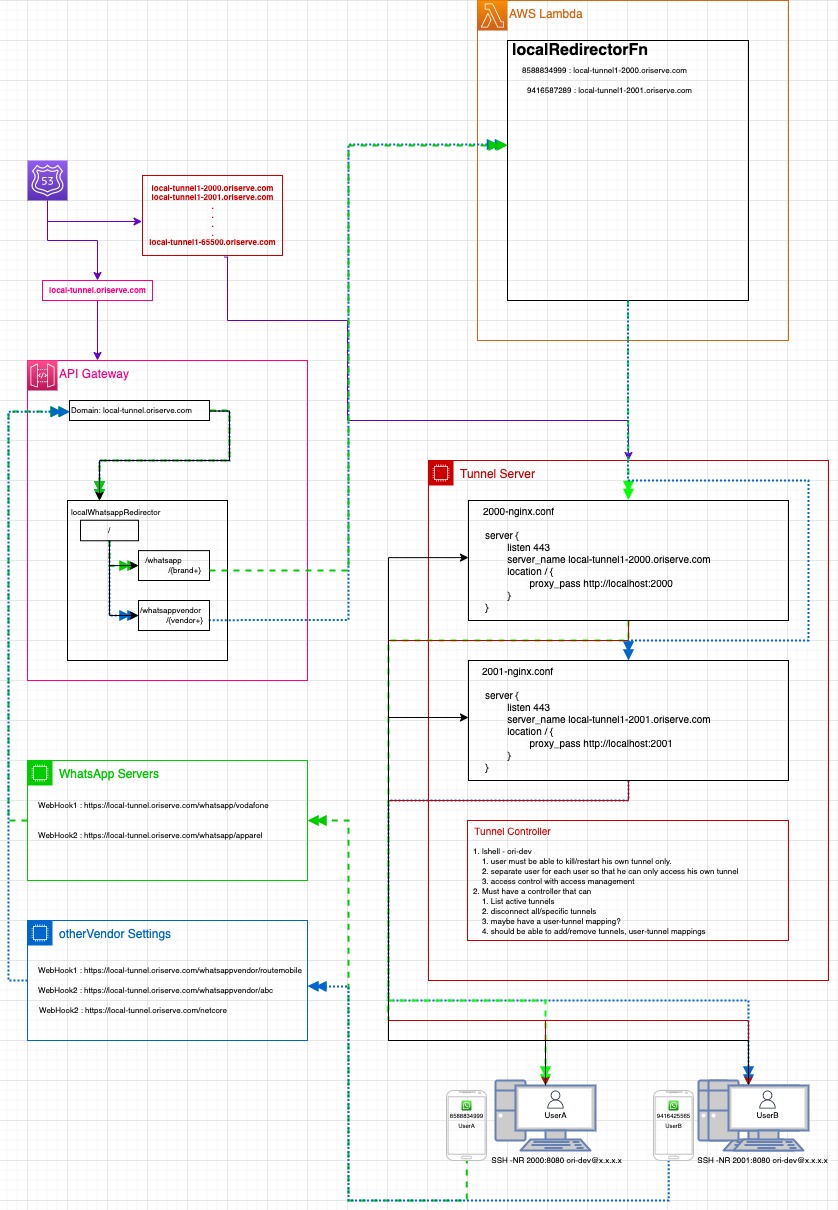
- Local-Tunnel: This is a generic tunnel mainly used for local WA development right now. In this, you're assigned an individual tunnel which is mapped to a personal ID of yours(phone number in case of WA). This allows you use the local WA number(+9188514-26472) to test your flows with your local OCS. Below is the solution diagram for the same.
- Dev Server Tunnel: In this you stop the process(ocs or any process for that matter) on the development server and setup the tunnel such that all the traffic is now being routed from your local ocs process.
- Developers
- DevOps
Pre-requisites
- SSH access to the server you need to tunnel to.
- SSH access to the tunnel controller.
- Basic understanding on linux commands to start/stop and check logs .via pm2
Local-Tunnel
- If you don't have a local-tunnel assigned to you, ask the DevOps team to provision it for you.
- You'll basically be assigned a port and url. For example:
- for port
2001, your backend url will behttps://local-tunnel1-2001.oriserve.com. This means that after connecting to the tunnel, traffic to this domain will be routed through your local ocs(running on port 8080). - Similarly, we can have tunnels from range
2001-65536
- This tunnel will be specific to a user and will be mapped to his/her personal ID, depending on the channel he/she is working on. For example:
- wa_id(phone number) in case of WA
- agentID in case of gbm, etc.
- Refer this for a basic solution diagram.
- Make sure OCS is running on local on port 8080.
- Once your tunnel is provisioned and details have been shared with you by the DevOps team. You can run a tunnel command in a separate terminal tab. Be sure to save this command as this will be bound to you.
- For example, if port
2001was assigned your tunnel command will bessh -N -R 127.0.0.1:2001:127.0.0.1:8080 ori-dev@13.235.64.204and the backend URL will behttps://local-tunnel1-2001.oriserve.com - Similarly, if port
2009was assigned your tunnel command will bessh -N -R 127.0.0.1:2009:127.0.0.1:8080 ori-dev@13.235.64.204and the backend URL will behttps://local-tunnel1-2009.oriserve.comand so on.
- For example, if port
- Once tunnel is created successfully, you can visit your assigned URL and should get the signature
Chatbotpage of ori. If you don't then there likely was an issue with the tunnel creation. You'll also notice access logs in you local OCS logs. - You can disconnect a tunnel by doing
ctrl+con the terminal tab where tunnel is running.
Dev Server Tunnel
- ssh into the dev server
- Get the ocs process id
pm2 ps
- Stop ocs process on server
pm2 stop id
- Run ocs on local on port 8080
- In a separate terminal tab, start tunnel from local
ssh -N -R 8080:127.0.0.1:8080 ori-dev@ip- You can verify that tunnel is successfully working by hitting the backend URL of the dev server in the browser. If the tunnel is connected as expected, you should see the signature
Chatbotpage in the browser and you'll notice a hit in your local OCS logs.
- Once testing is done, make sure to close tunnel. This can be done by doing
ctrl+con the terminal tab where tunnel is running. - Make sure to start the process on server again
pm2 start id
Note: It is very important that you stop the ocs process on dev server before you create the tunnel and start the process back after you're done.
Local-Tunnel
Refer this for a basic solution diagram.
Pre-Requisites
- Go to the accessmanagement repo.
- First verify whether user key is present in
all_keys. If it is not, ask with the person and get the .pub key add it inall_keysasfirstName_lastName.key - Add the
keyin the users file inside the projecttunnel_controller.- File path:
projects/tunnel_controller/userKeys/users
- File path:
- Push the code in your branch and raise PR to the main branch v2.
- After the request is merged, Run this job Link
Lambda
In the awsLambda repository go to DO-547/genericTunnel_dev branch and create a new branch from it.
Under the directory
code/constants/differentiatorMappingsAdd the respective differentiator mapping for the user's ID for the type of channel the user has requested the tunnel for. For example in case of WA
In the file,
code/constants/differentiatorMappings/nativeWhatsApp.jsMake the following changes to the variable
differentiatorMappingas shown belowAdd a
wa_id(phone number) and it's correspondinguser_nameandenvconst differentiatorMapping = {
//wa_id or recipient_id: {userTunnel: 'name', env: 'local/dev/uat/prod'}
"918588834999": { userTunnel: 'nipun_jain', env: 'local' },
// "919205979839": { userTunnel: 'shivanshu_chaurasia', env: 'local' },
"919599281176": { userTunnel: 'mayank_harbola', env: 'local' },
"918085149997": { userTunnel: 'prasanna_bisen', env: 'local' },
"919891239146": { userTunnel: 'ajay_saini', env: 'local' },
"918076153618": { userTunnel: 'akash_dagar', env: 'local' },
"917004516734": { userTunnel: 'mrityunjay_kumar', env: 'local' },
}
In the file
code/constants/constants.jsMake the following changes to the variable
envUserBrandWebhookas shown belowAdd the
user_nameandURLmapping in the respectiveenvblock.If a new user is to be added, replace one of the
port_numberson the left with theuser_name. Similarly, more can be added in the same format.Note the
port_numberand theURLfor theuser_name.const envUserBrandWebhook = {
local: {
"nipun_jain": "https://local-tunnel1-2000.oriserve.com",
// "shivanshu_chaurasia": "https://local-tunnel1-2001.oriserve.com",
"mrityunjay_kumar": "https://local-tunnel1-2001.oriserve.com",
"prasanna_bisen": "https://local-tunnel1-2002.oriserve.com",
"mayank_harbola": "https://local-tunnel1-2003.oriserve.com",
"ajay_saini": "https://local-tunnel1-2004.oriserve.com",
"akash_dagar": "https://local-tunnel1-2005.oriserve.com",
"2006": "https://local-tunnel1-2006.oriserve.com",
"2007": "https://local-tunnel1-2007.oriserve.com",
"2008": "https://local-tunnel1-2008.oriserve.com",
"2009": "https://local-tunnel1-2009.oriserve.com",
"2010": "https://local-tunnel1-2010.oriserve.com",
},
dev: {
"vi-neo": "https://vi-neo-dev.oriserve.com"
},
uat: {
"vodafone": "https://webtest.vodafone-elb.oriserve.in/gbc",
},
prod: {
//bajaj
"bajaj": "https://bajaj.oriserve.com/gbc"
}
};
In this example
nipun_jainis mapped tohttps://local-tunnel1-2000.oriserve.comimplying he's assigned port2001ajay_sainiis mapped tohttps://local-tunnel1-2004.oriserve.comimplying he's assigned port2004and so on.
Once this is done, commit and push the changes and raise a PR for it.
Route53
- Map the required
URL, calculated in the previous step with the Tunnel Controller server IP. IP can be found from the EC2 console. Example:
- Map the required
Tunnel Controller
- Create and add the required nginx conf and generate the SSL for the new tunnel domain which was mapped.
- For naming convention take reference from previously added configurations.
- Add the certificate renewal commands for the new
URLin/renewCerts/renew_certs.sh
Dev Server Tunnel
- Read and understand the documentation mentioned in the developer section. No additional steps is required to set it up from DevOps point of view.
- Just make sure the pre-requisites are met