MFA
Steps to enable MFA for your AWS account
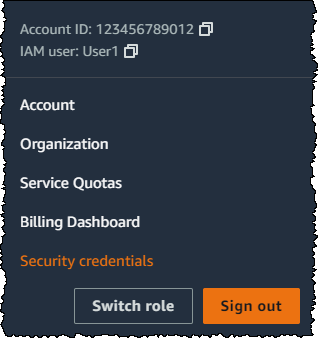
- In the navigation bar on the upper right, choose your user name, and then choose My Security Credentials.
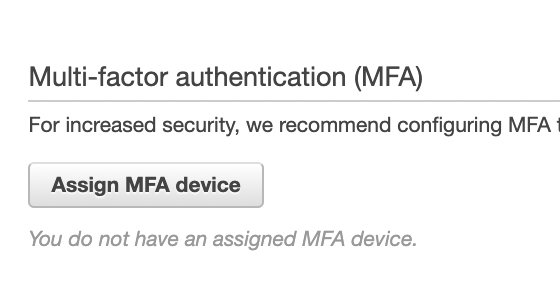
- Now add an MFA device. In the Multi-factor Authentication (MFA) section, choose Assign MFA device. Meanwhile download the Google Authenticator app on your phone.
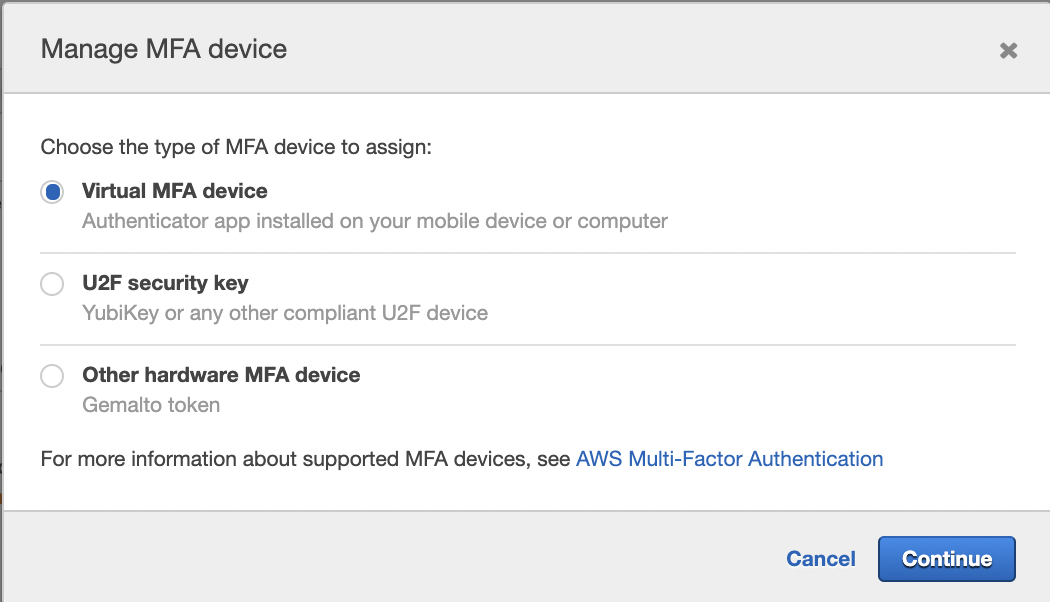
- Choose Virtual MFA device, and then click Continue.
- On the Google Authenticator app:
- Click the (+) plus icon in the bottom left.
- Select scan a QR code.
- From the wizard, choose Show QR code. Then use the app to scan the QR code.
- In the Manage MFA Device wizard, in the MFA Code 1 box, type the one-time password that currently appears in the virtual MFA device. Wait up to 30 seconds for the device to generate a new one-time password. Then type the second one-time password into the MFA Code 2 box.
- Choose Assign MFA.
- Sign out and Sign in once for the changes to take effect.
Working with with AWS SDK/CLI with MFA enabled accounts
AWS CLI or AWS SDK calls wit won't work as expected if an IAM users has MFA enabled.
Prerequisite
- AWS CLI v2
- AWS access and an IAM user with the necessary permissions. If you don't have this raise a request with the DevOps team.
- You'll need AWS programmatic access that means your AWS_ACCESS_KEY_ID and AWS_SECRET_ACCESS_KEY.
- You'll also need AWS console access to setup MFA as explained in the linked document.
- If AWS console access is not required for any other reason, please ask the DevOps team to disable the access once you've successfully linked a MFA device with your IAM user
- You'll need your MFA device ID from the IAM console, if you're not sure how to get this, ask a DevOps team member to help you with the same.
- Finally, you'll need to configure AWS CLI on your local machine.
- You can either set this up by manually by running the command and then filling the interactive prompts as shown below
aws configure
AWS Access Key ID [None]: your_AWS_ACCESS_KEY_ID
AWS Secret Access Key [None]: your_AWS_SECRET_ACCESS_KEY
Default region name [None]: ap-south-1
Default output format [None]: - Or, you may use the credentials.csv file which must've been shared with you by the DevOps team as shown below
aws configure import --csv file://location_to_csv_on_local/your_credentials_file_name.csv
- You can either set this up by manually by running the command and then filling the interactive prompts as shown below
- Now you can use the below helper script to setup temporary credentials. These will be valid for 3 days, so you'll have to rerun the script once the credentials expire
- MacOS
- Ubuntu
- Windows
#!/bin/bash
MFA_ID=$1
MFA_CODE=$2

## Setup tmp folder for tmp files
[[ -d ~/aws_tmp_files ]] && (echo "Old aws_tmp_files directory found in ${HOME} directory, deleting it." && rm -rf ~/aws_tmp_files)
mkdir -p ~/aws_tmp_files && echo "Creating aws_tmp_files in ${HOME} directory for temporary files"

## Resetting previous env variables
echo "\nPrevious environment variables"
echo "AWS_ACCESS_KEY_ID: ${AWS_ACCESS_KEY_ID}"
echo "\nAWS_SECRET_ACCESS_KEY: ${AWS_SECRET_ACCESS_KEY}"
echo "\nAWS_SESSION_TOKEN: ${AWS_SESSION_TOKEN}\n"

unset AWS_ACCESS_KEY_ID
unset AWS_SECRET_ACCESS_KEY
unset AWS_SESSION_TOKEN

echo "\nReceived MFA ID: ${MFA_ID}\nCURRENT MFA CODE: ${MFA_CODE}\n"
([[ -z ${MFA_ID} ]] || [[ -z ${MFA_CODE} ]]) && echo "Please provide both MFA ID and CURRENT MFA CODE" && return 1 || echo "Proceeding with token generation."

## Generating temporary credentials and token
aws sts get-session-token --duration-seconds 129600 --serial-number ${MFA_ID} --token-code ${MFA_CODE} > ~/aws_tmp_files/aws_creds.tmp

[[ $? -ne 0 ]] && echo "Token generation failed. Please try later." && return 1 || echo "Token generated successfully!"

## Setting new env variables
echo "export AWS_ACCESS_KEY_ID=$(echo $(cat ~/aws_tmp_files/aws_creds.tmp  | awk '/AccessKeyId/ {print $2}' | sed 's/,//g;s/"//g'))" > ~/aws_tmp_files/set_env
echo "export AWS_SECRET_ACCESS_KEY=$(echo $(cat ~/aws_tmp_files/aws_creds.tmp  | awk '/SecretAccessKey/ {print $2}' | sed 's/,//g;s/"//g'))" >> ~/aws_tmp_files/set_env
echo "export AWS_SESSION_TOKEN=$(echo $(cat ~/aws_tmp_files/aws_creds.tmp  | awk '/SessionToken/ {print $2}' | sed 's/,//g;s/"//g'))" >> ~/aws_tmp_files/set_env
source ~/aws_tmp_files/set_env

echo "\nNew environment variables"
echo "AWS_ACCESS_KEY_ID: ${AWS_ACCESS_KEY_ID}"
echo "\nAWS_SECRET_ACCESS_KEY: ${AWS_SECRET_ACCESS_KEY}"
echo "\nAWS_SESSION_TOKEN: ${AWS_SESSION_TOKEN}\n"

echo "\n\nNote: To utilise these credentials in any other terminal tab/window, you'll need to run the below command in that terminal tab/window"
echo "      source ~/aws_tmp_files/set_env \n"

return 0
Place the script anywhere, save it as generate_aws_tmp_creds.sh
Add execute permissions to the script
Run it in the terminal as below from the directory where the script is placed
cd dir_to_put_the_script_in
## either copy/paste with GUI or use vim/nano
vim generate_aws_tmp_creds.sh
## paste the above script
## :wq! to save and exit vim
chmod +x generate_aws_tmp_creds.sh
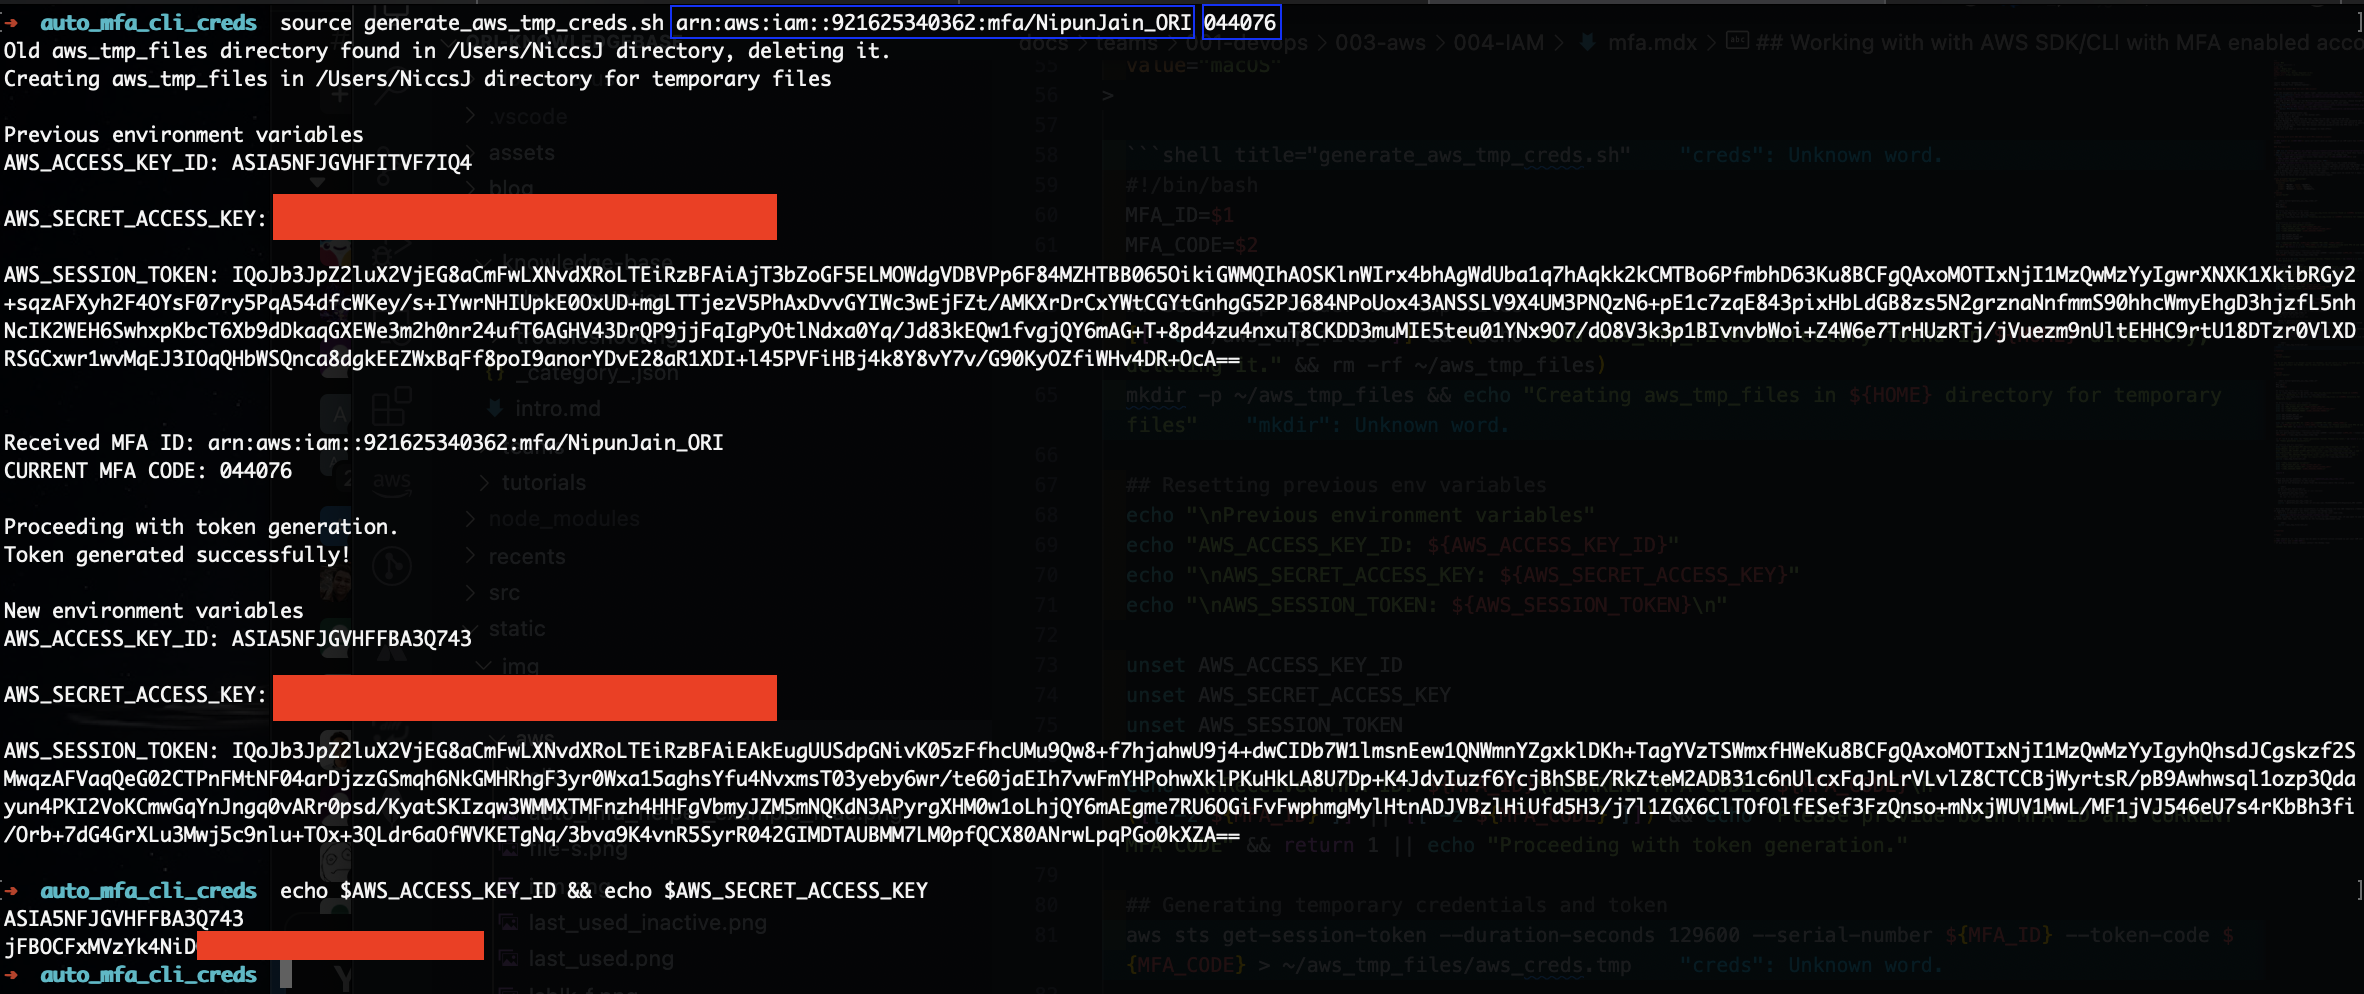
source ./generate_aws_tmp_creds.sh arn:aws:iam::921625340362:mfa/NipunJain_ORI 123456
Once the helper script runs successfully it shall display the new AWS temporary credentials it exported, if you don't see those contact the DevOps team.
- Here's a screenshot of how a successful script run will look like.
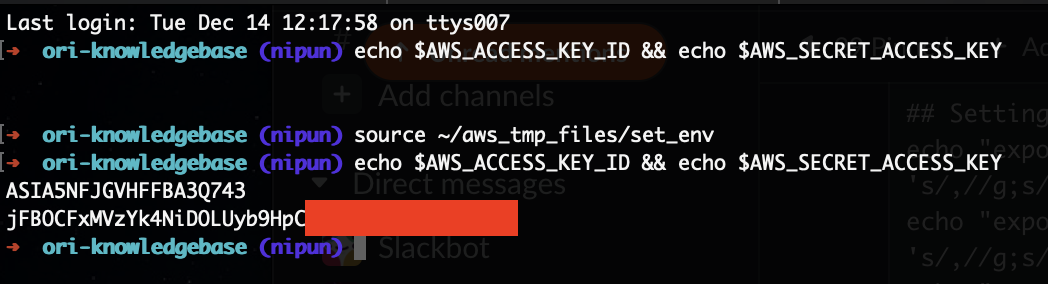
These variables will be available only in the current terminal tab. If you want to use these in other open tabs, you'll need to do the following additional step
source ~/aws_tmp_files/set_env- Here's screenshot showing initially the required variables were empty, but after the above command we can see variables were seeded.
As of now there's no helper script for Windows, do not worry it's being worked upon. For now, please contact the DevOps team to help you set this up manually.
#!/bin/bash
MFA_ID=$1
MFA_CODE=$2

## Setup tmp folder for tmp files
[[ -d ~/aws_tmp_files ]] && (echo -en "Old aws_tmp_files directory found in ${HOME} directory, deleting it." && rm -rf ~/aws_tmp_files)
mkdir -p ~/aws_tmp_files && echo -en "Creating aws_tmp_files in ${HOME} directory for temporary files"

## Resetting previous env variables
echo -en "\nPrevious environment variables"
echo -en "AWS_ACCESS_KEY_ID: ${AWS_ACCESS_KEY_ID}"
echo -en "\nAWS_SECRET_ACCESS_KEY: ${AWS_SECRET_ACCESS_KEY}"
echo -en "\nAWS_SESSION_TOKEN: ${AWS_SESSION_TOKEN}\n"

unset AWS_ACCESS_KEY_ID
unset AWS_SECRET_ACCESS_KEY
unset AWS_SESSION_TOKEN

echo -en "\nReceived MFA ID: ${MFA_ID}\nCURRENT MFA CODE: ${MFA_CODE}\n"
([[ -z ${MFA_ID} ]] || [[ -z ${MFA_CODE} ]]) && echo -en "Please provide both MFA ID and CURRENT MFA CODE" && return 1 || echo -en "Proceeding with token generation."

## Generating temporary credentials and token
aws sts get-session-token --duration-seconds 129600 --serial-number ${MFA_ID} --token-code ${MFA_CODE} > ~/aws_tmp_files/aws_creds.tmp

[[ $? -ne 0 ]] && echo -en "Token generation failed. Please try later." && return 1 || echo -en "Token generated successfully!"

## Setting new env variables
echo "export AWS_ACCESS_KEY_ID=$(echo $(cat ~/aws_tmp_files/aws_creds.tmp  | awk '/AccessKeyId/ {print $2}' | sed 's/,//g;s/"//g'))" > ~/aws_tmp_files/set_env
echo "export AWS_SECRET_ACCESS_KEY=$(echo $(cat ~/aws_tmp_files/aws_creds.tmp  | awk '/SecretAccessKey/ {print $2}' | sed 's/,//g;s/"//g'))" >> ~/aws_tmp_files/set_env
echo "export AWS_SESSION_TOKEN=$(echo $(cat ~/aws_tmp_files/aws_creds.tmp  | awk '/SessionToken/ {print $2}' | sed 's/,//g;s/"//g'))" >> ~/aws_tmp_files/set_env
source ~/aws_tmp_files/set_env

echo -en "\nNew environment variables"
echo -en "AWS_ACCESS_KEY_ID: ${AWS_ACCESS_KEY_ID}"
echo -en "\nAWS_SECRET_ACCESS_KEY: ${AWS_SECRET_ACCESS_KEY}"
echo -en "\nAWS_SESSION_TOKEN: ${AWS_SESSION_TOKEN}\n"

echo -en "\n\nNote: To utilise these credentials in any other terminal tab/window, you'll need to run the below command in that terminal tab/window"
echo -en "      source ~/aws_tmp_files/set_env \n"

return 0
Place the script anywhere, save it as generate_aws_tmp_creds.sh
Add execute permissions to the script
Run it in the terminal as below from the directory where the script is placed
cd dir_to_put_the_script_in
## either copy/paste with GUI or use vim/nano
vim generate_aws_tmp_creds.sh
  ## paste the above script
  ## :wq! to save and exit vim

chmod +x generate_aws_tmp_creds.sh
source ./generate_aws_tmp_creds.sh arn:aws:iam::921625340362:mfa/NipunJain_ORI 123456
Once the helper script runs successfully it shall display the new AWS temporary credentials it exported, if you don't see those contact the DevOps team.
- Here's a screenshot of how a successful script run will look like.
These variables will be available only in the current terminal tab. If you want to use these in other open tabs, you'll need to do the following additional step
source ~/aws_tmp_files/set_env- Here's screenshot showing initially the required variables were empty, but after the above command we can see variables were seeded.
- That should do it. You should now be able to perform action allowed as per your IAM user with AWS CLI and AWS SDK.
- If you face any issues, please contact the DevOps team