sunrise
- This doc explains about the sunrise operation.
sunriseis an operation which is used to retrieve the stopped/terminated instances.- There are two types of sunset.
Hard sunrise: Where the recreating or retreiving the features/service which is terminated through sunrise operation.Soft sunrise: Where the restarting the features/service which is stopped through sunrise operation.
single stack
- single stack contains the
Fullstack,AIservers.
soft_sunrise
Let the brandName in this doc be
bajaj-thaiYou will find the brand Folder in the Archived location in the s3 bucket
s3://oriservedemos/Archive/bajaj-thaiMove this brandFolder to the
s3://oriservedemos/Now, the location of brand folder would be
S3://oriservedemos/bajaj-thai/You will find the all files related to
bajaj-thaiStart the instances
Fullstack,AIthat are stopped through sunset operation.Login to the
Fullstackinstance.Create a
db_backupfolder on the home directory.You will find the backup of the database that we taken through sunset operation at
s3://ori-db-backup/bajaj-thaicopy the db backup to the newly created directory
db_backup- command:
cd db_backup - command :
s3://ori-db-backup/bajaj-thai/Backup/database/Development/oriserveDemoDB/ .
- command:
Whenever we restart the instance, I.P will changed. So, update the new public I.P at the
Route53under domainName- DomainName :
bajaj-thai-dev.oriserve.combajaj-thai-dashboard.oriserve.combajaj-thai-ai.oriserve.com
- DomainName :
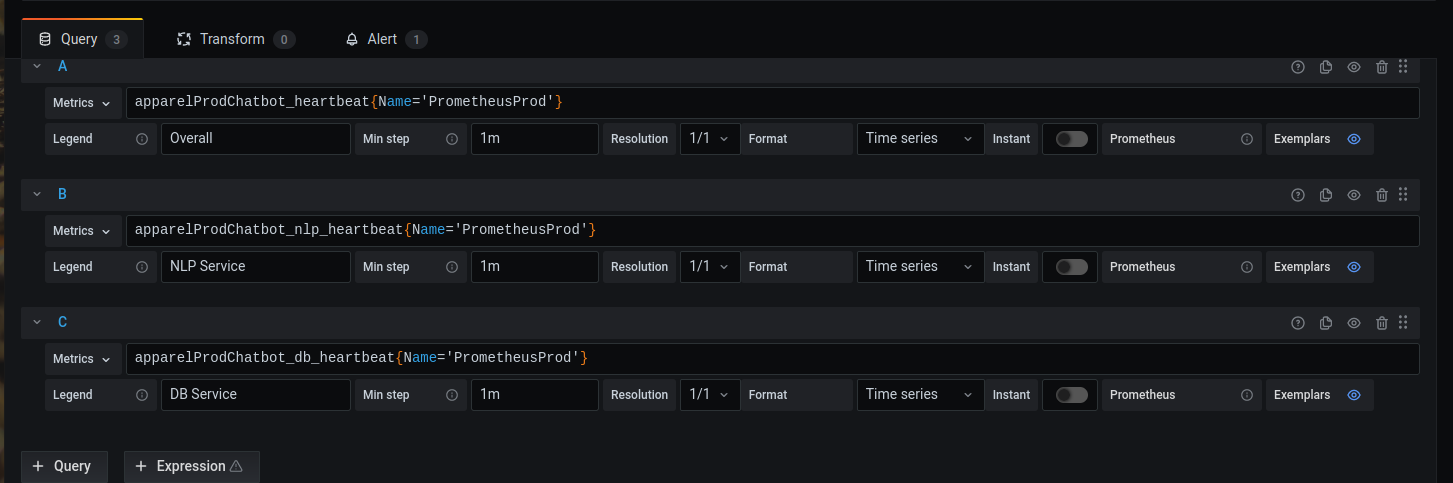
bot_heart_beat_retrieval
- In soft sunrise, we need to redirect the alarms from
dumped-grafana-alertstoBot Notification Slack - Log into the grafana
- You can see the folder
chatbotas below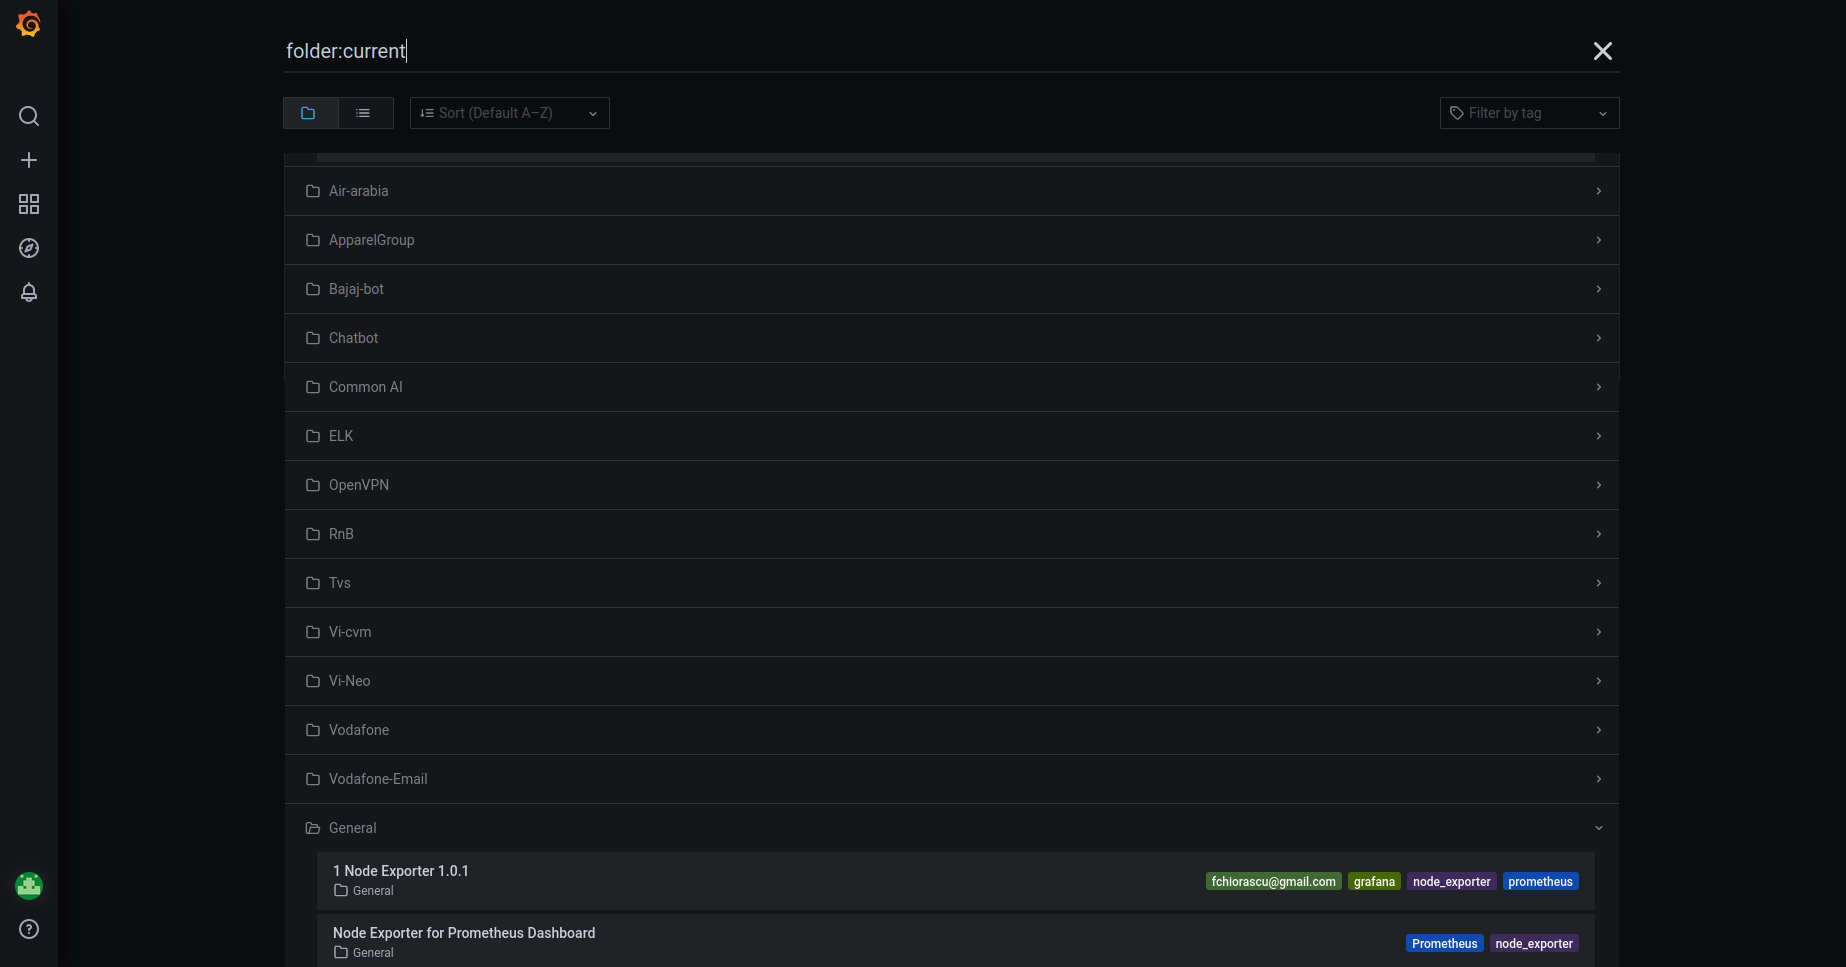
- Get into the chatbot folder, you will find the heartbeats like below
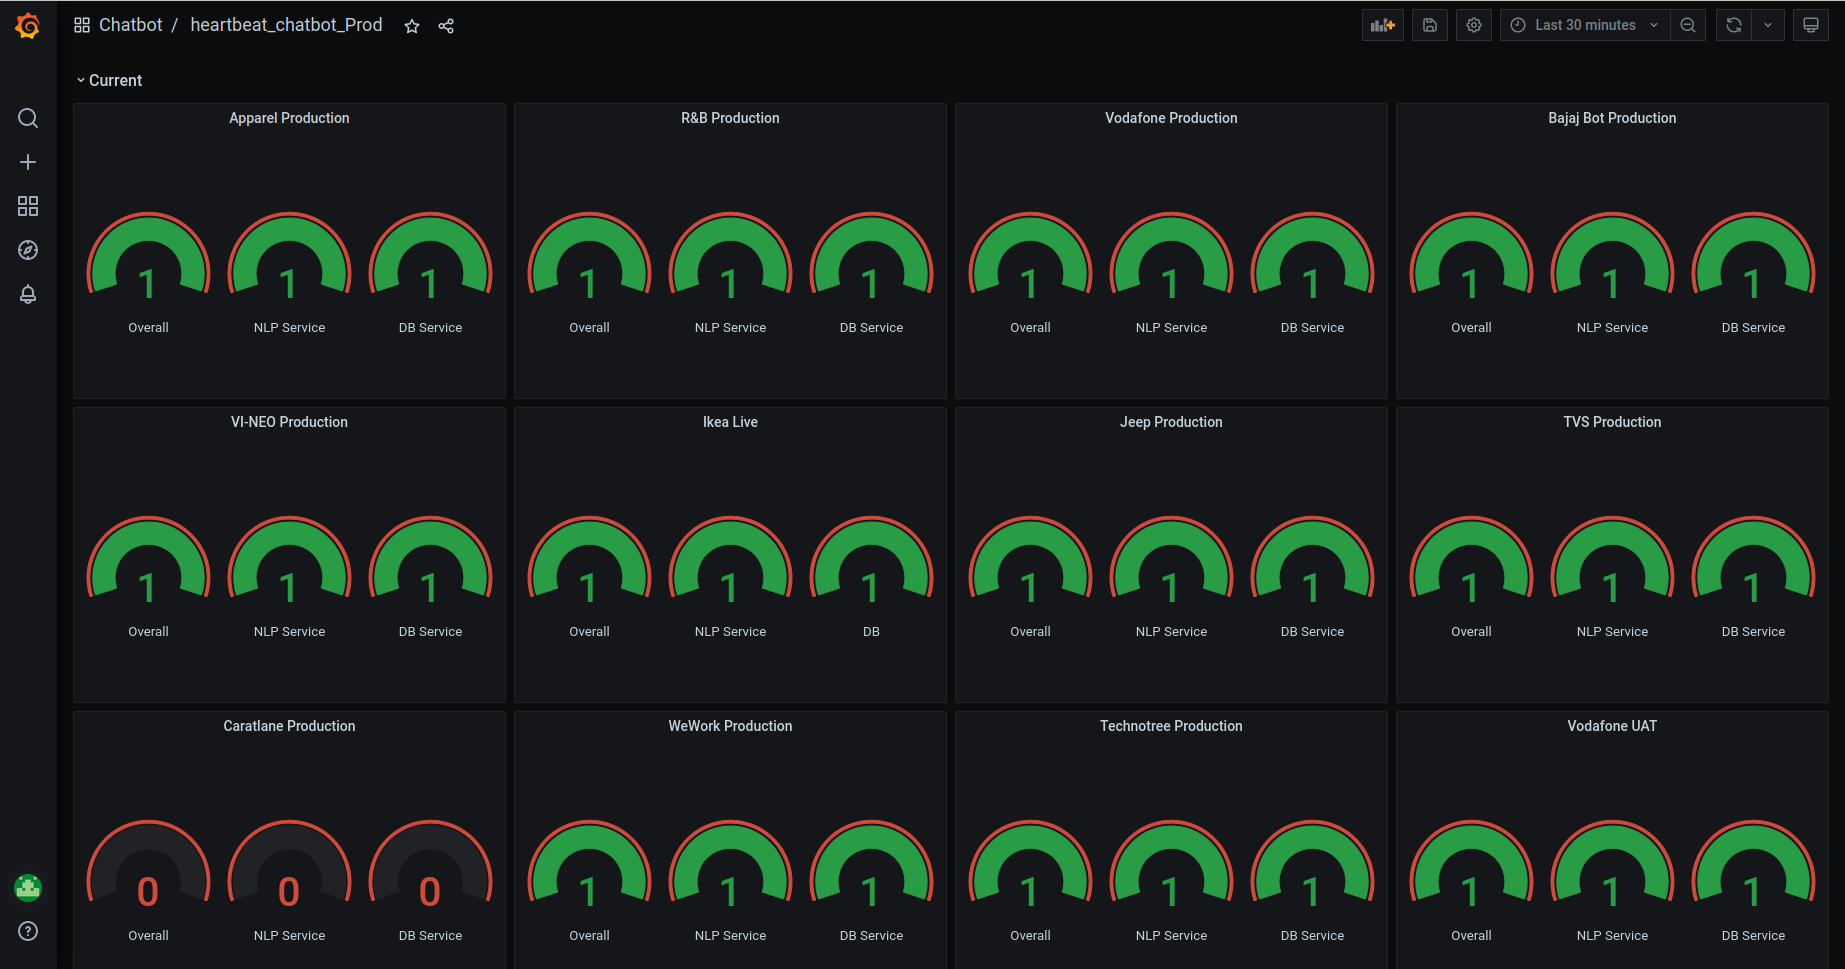
- Scroll down , you can see the alerts like below
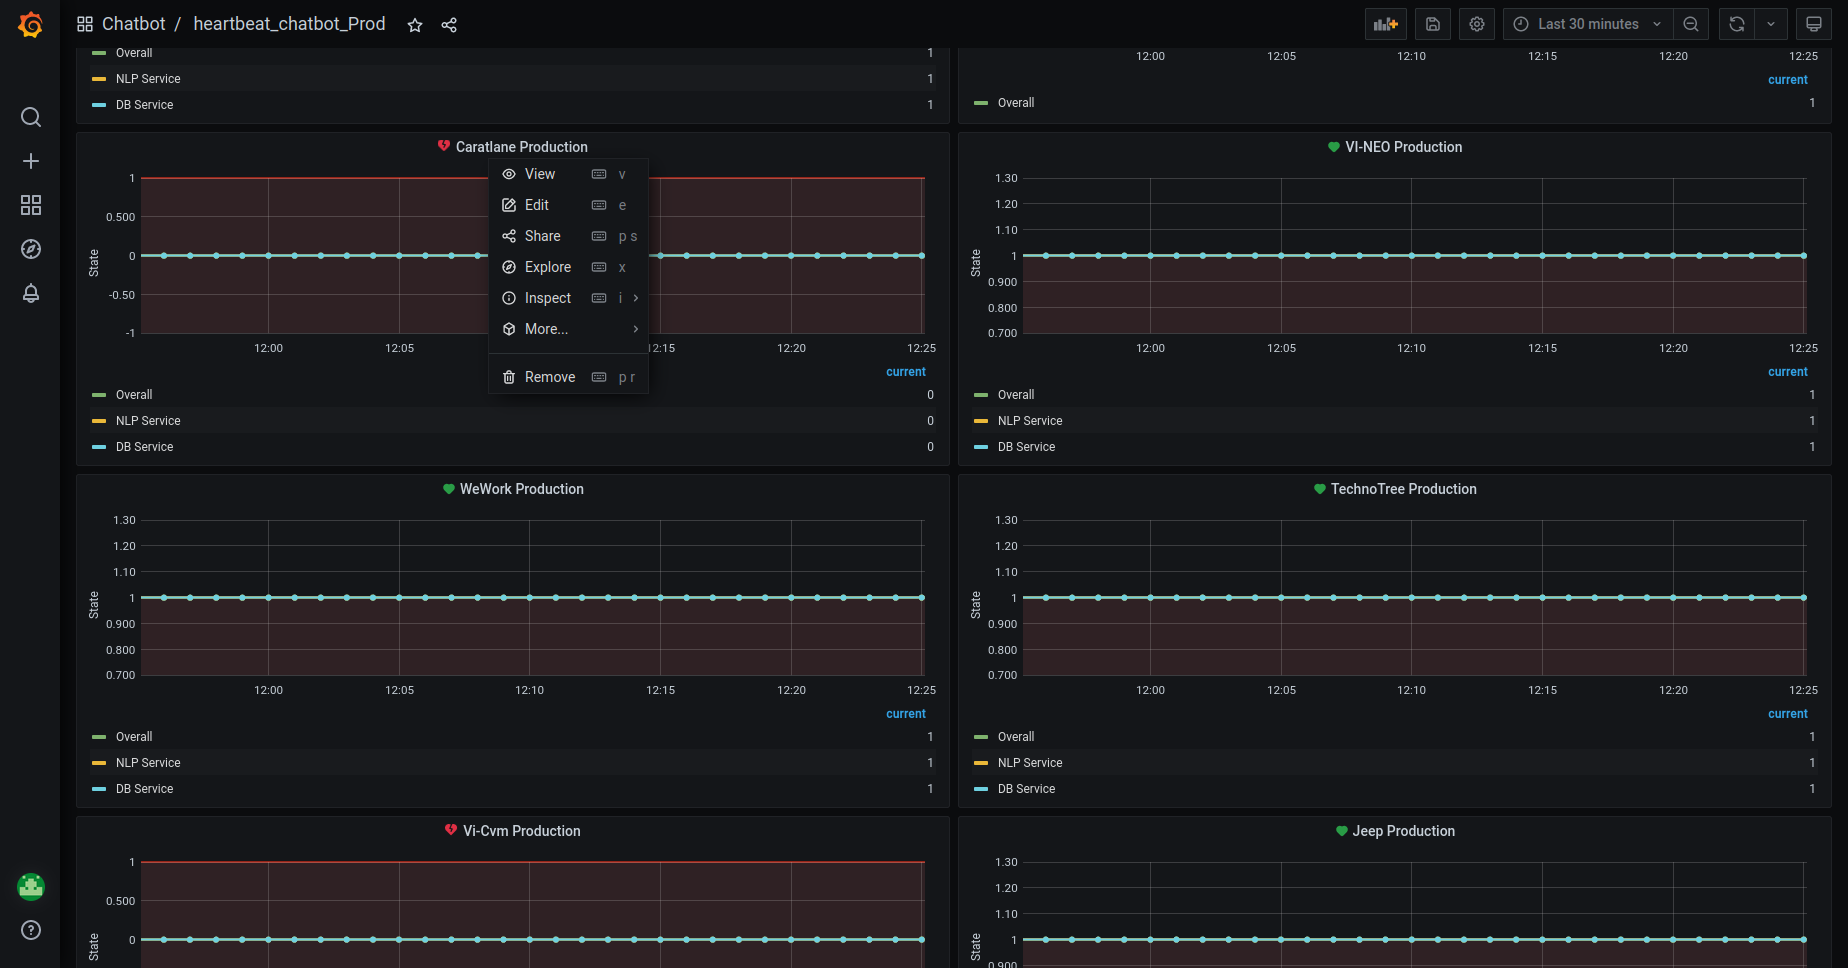
- Click on the
Edit. It will redirect to the page like this
- In the
Alertsection, forSendtooption,- Remove the existing
alerts. - Add the
Bot Notification Slackchannel and remove thedumped-grafana-alerts
- Remove the existing
- Save the
Alert.
JENKINS_JOBS_RETRIEVAL
Now, we need to retrieve the jenkins jobs from the backup folder.
Let's say we need to retrieve the bajaj-thai brand.
Log into the Jenkins server.
Create a directory
/tmpJenkins jobs backup is at the location in s3
s3://oriserve-demos/bajaj-thai/Backup/Environment/Development/Jenkins/Copy this backup zip folder.
- command :
sudo aws s3 cp s3://oriserve-demos/bajaj-thai/Backup/Environment/Development/Jenkins/tata_capital_devjobs.zip /tmp
- command :
Go to
/tmpdirectory.- command :
cd /tmp
- command :
Unzip the folder
- command :
unzip bajaj-thai_devjobs.zip
- command :
You will get the jobs folder. Copy this folder to the jenkins jobs folder.
- command :
sudo mv bajaj-thai_devjobs /var/lib/jenkins/jobs/
- command :
SafeRestart the jenkins
SafeRestart: This type of restart will allow all running jobs to complete. New jobs will remain in the queue to run after the restart is complete.- To saferestart the jenkins, follow the below step.
jenkins_url/safeRestartin browser.
- To saferestart the jenkins, follow the below step.
Check the jenkins console, you will find the new jobs.
PNG_DASHBOARD_SETUP
- To setup the PNG dashboards, we have configured a job.
- Login to Jenkins,
- Check for the
Iaas-->IaasUtilities-->IaaS_create_png_dashboard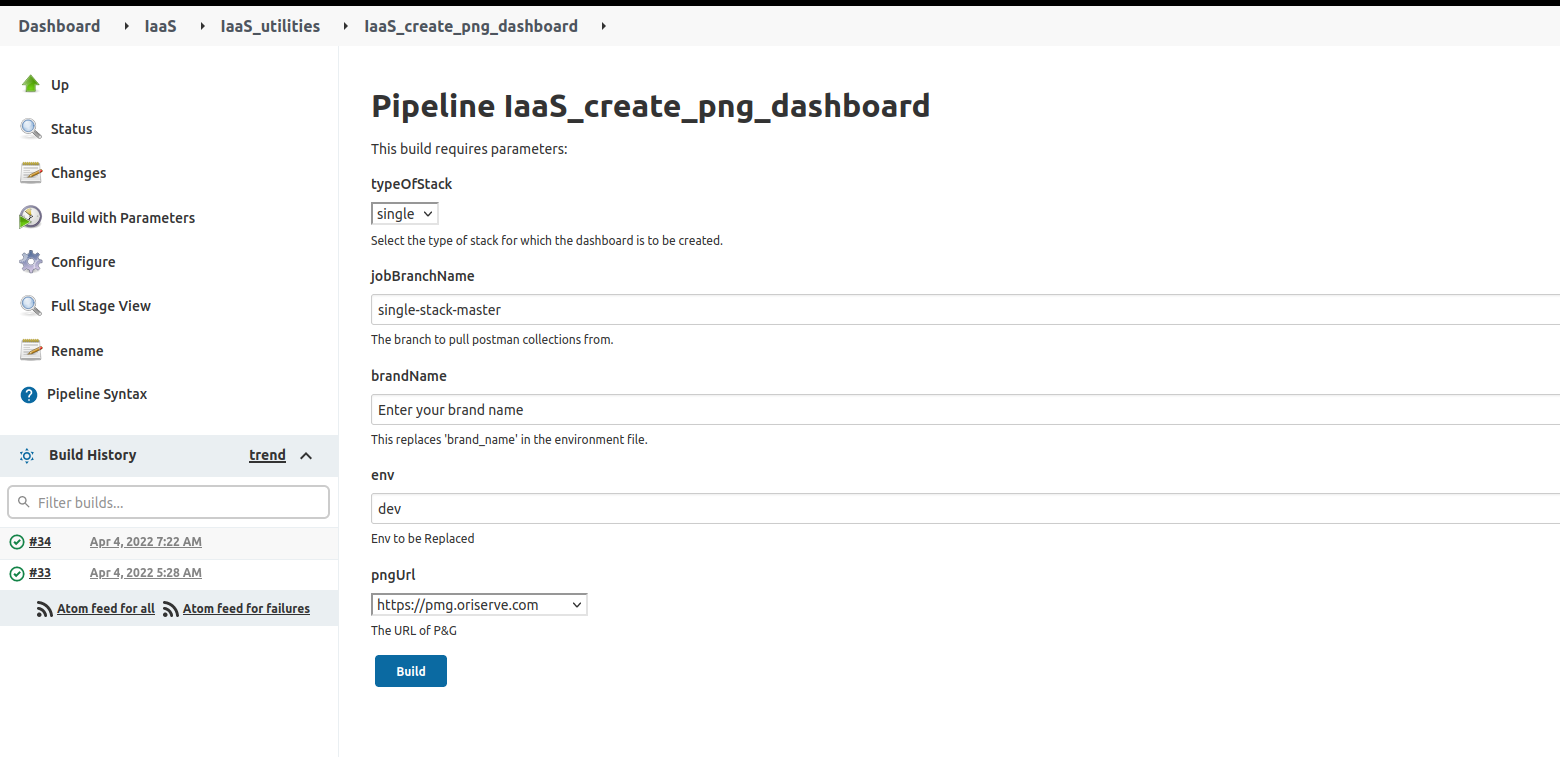
- Provide the values as per the stack.
Type of stack:singlefor single stack.jobBranchName: This is the main master branchbrandName: Enter the brandName.env: Dev
hard_sunrise
The entire backup of the previous database is stored in the S3 location:
s3://ori-db-backup/bajaj-thai/Backup/database/Environment/dbName/- Environment would be
Development
- Environment would be
- Change the brandName as per the requirement.
You will find the brand Folder in the Archived location in the s3 bucket
s3://oriservedemos/Archive/Move this brandFolder to the
s3://oriservedemos/Change the folder that created through stack to
brandName_backupbajaj_thai_backup
Create the instances
FullstackanddevAiservers..- Mostly,
AMIwould be the latest respective AMI- Refer the doc for stack_creation
- Mostly,
Choose the right instance Configuration , SG, KeyPair.
- For the confirmation of
AMI,SG,KeyNamecontact to theDevOpsTeam.
- For the confirmation of
Login to the
FullstackinstanceInitially, copy the backup data to the newly created folder
dbBackupon instance.Copy the data from
dbBackupfolder to docker container.We have the script, to restore the database.
#!/bin/bash
echo "Please enter DB name : "

read -rp "Default[oriserveDemoDB] : " DBName
[[ -z ${DBName}  ]] && DBName="oriserveDemoDB"
echo "Please enter DB user : "
read -rp "Default[dbOwner] : " DBuser
[[ -z ${DBuser} ]] && DBuser="dbOwner"
echo "Please enter DB user's password : "
read -rp "Default[oriSaaSdemo1092] : " DBuserpass
[[ -z ${DBuserpass} ]] && DBuserpass="oriSaaSdemo1092"
mongorestore -v -h 127.0.0.1:27017 -u ${DBuser}r -p ${DBuserpass} --authenticationDatabase ${DBName} -d ${DBName} --dir ./db_backup --gzip --dropRun the script with
sudoprivilages.- While running the script you need to provide the
DBName,DBuser,DBpassword
- While running the script you need to provide the
Access_management_retrieval
- As part of the hard sunset, we have moved the
brand folderinto thesunsetinaccess management repo. - Now, we need to get back this
brand folderinto theprojects.- Let's say, we need to retrieve the
bajaj-thaibrand.- Clone the
access_management_repointo your local. - You will find the
sunsetfolder.Inside this, we will find all the brands, which we have madehard sunset. - Along with the
sunsetfolder, you can find,projectsfolder, which is used for access_management. - Move the brand folder
bajaj-thaitoprojectsfolder.- command:
mv sunset/bajaj-thai/ projects/
- command:
- Commit the changes in local and push to the repository.
DevOpslead will review the changes and will merge it.
- Clone the
- Let's say, we need to retrieve the
Jenkins_job_creation
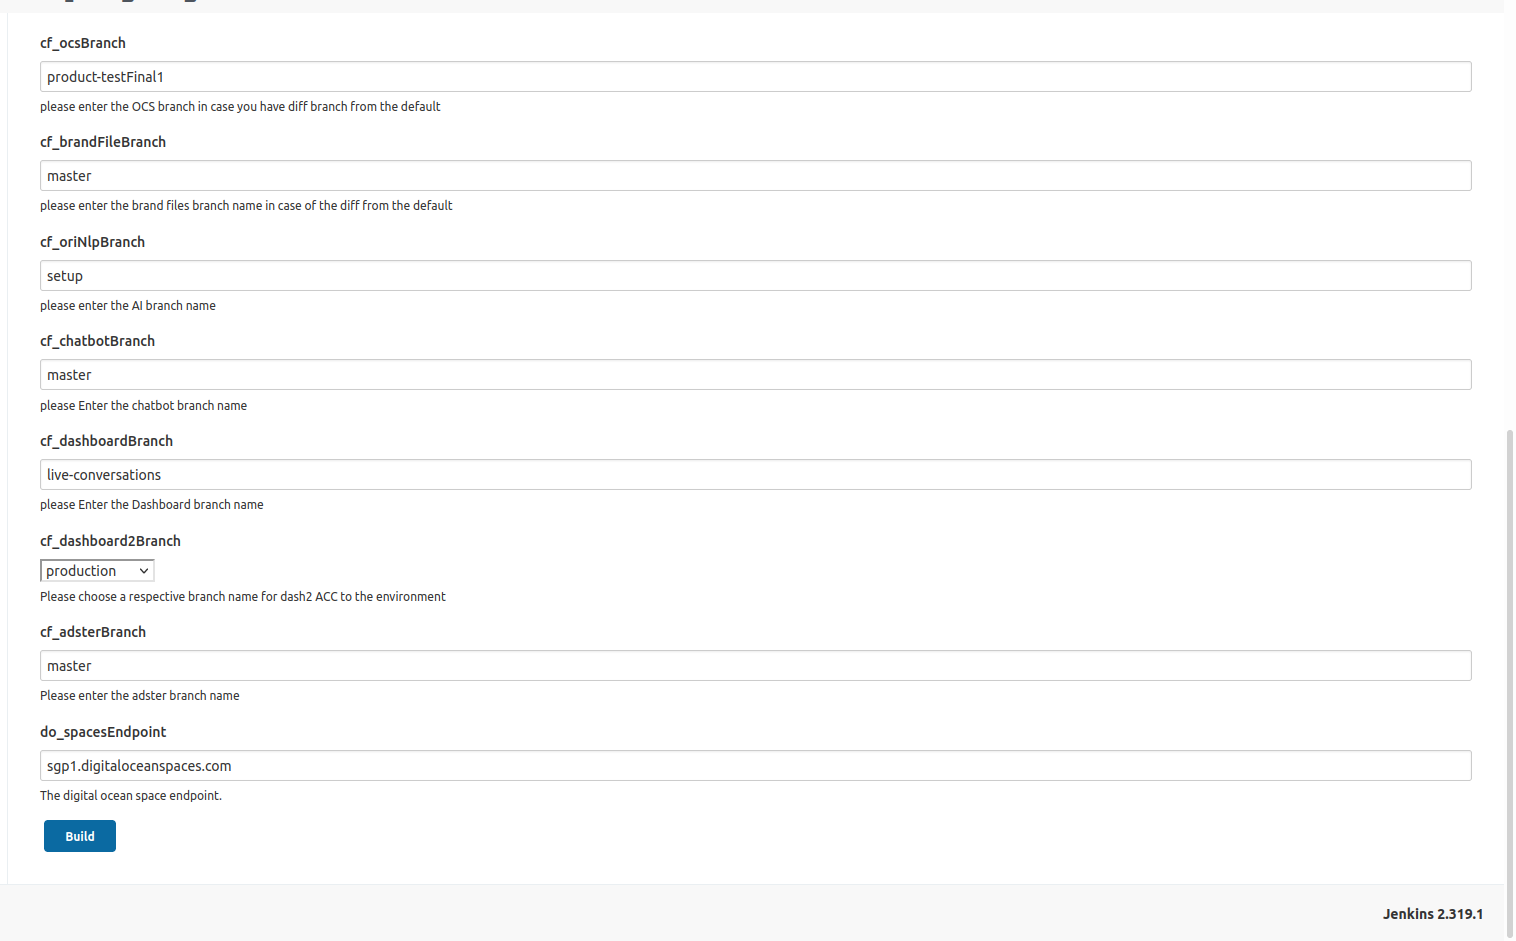
We have configured the jenkins_job to create the new jenkins_jobs for a specific brand.
Login to the Jenkins.
Check for view
IaaSthen go theIaaS-->IaaS_utilities-->IaaS_create_jenkins_jobs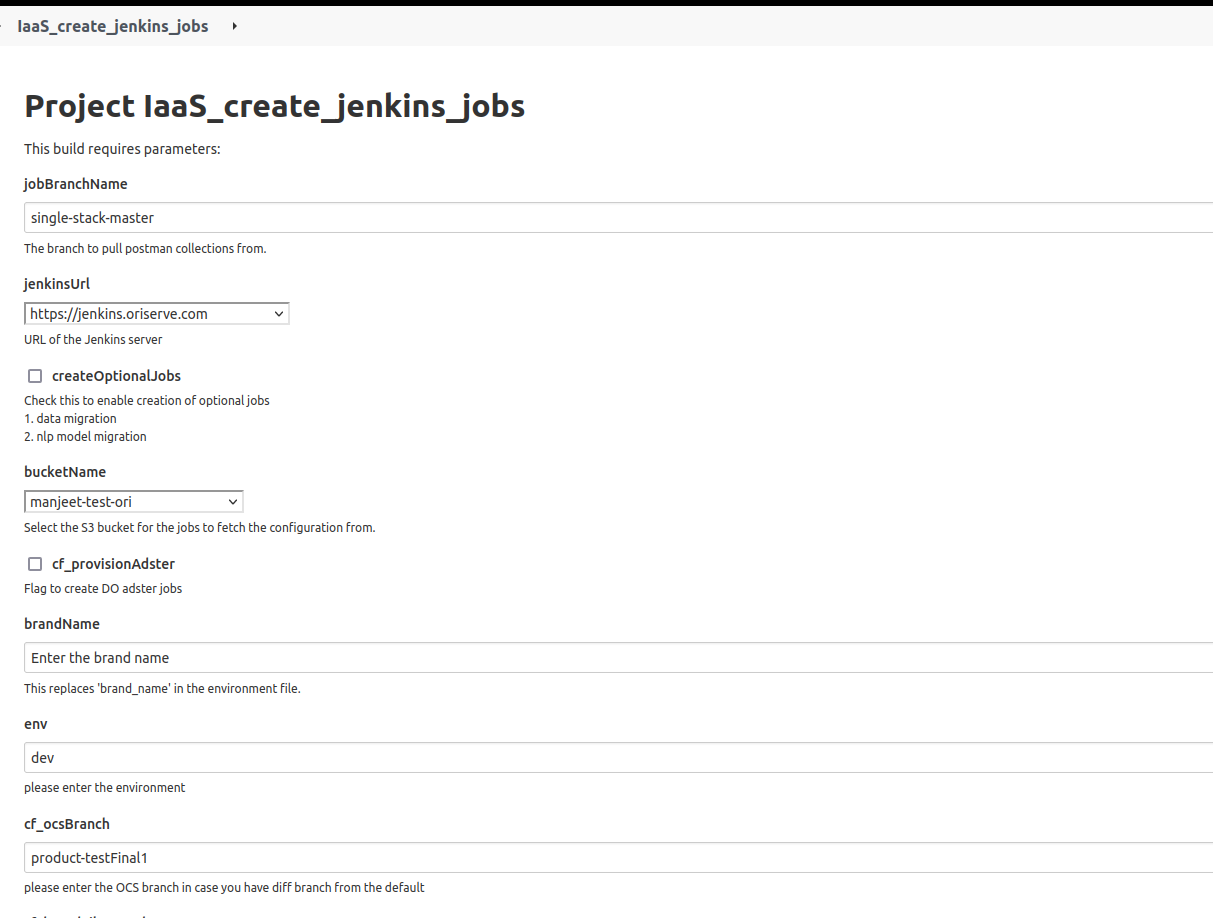
Take above image as reference and provide the necessary details as per your requirement.
jobBranchName: This is our main branch, which is used to pull the collection.jenkinsUrl: Based on the jenkins which is used in the region choose the value.- For mumbai :
https://jenkins.oriserve.com - For ireland :
https://jenkins-ireland.oriserve.com - For N.Virginia :
https://jenkins-nvirginia.oriserve.com
- For mumbai :
createOptionalJobs: Check this if you need to create the two separate jobs for Datamigration and NLP models.bucketName: Select the bucket as per your usage.manjeet-test-orifor test_caseoriserve-demosforMumbairegionoriserve-demos-nvirginiaforN.Virginiaregion.
cf_provisionAdster: Check this if you need to create a jobs foradsterdeployments.brandName: Give the brandName you want to create.env: choose the envDev/Uat/Prodcf_ocsBranch: Choose the ocs branchcf_brandFileBranch: Choose the brandFiles branchcf_oriNlpBranch: Choose the NLP branchcf_chatbotBranch: Choose the chantbot branchcf_dashboardBranch: Choose the dashboard branchcf_dashboard2Branch: Choose the dashboard2 branchcf_adsterBranch: Choose the adster branch.
Get the confirmation from the
DevOps Leadbefore passing the values.After Providing the necessary values, build the job.
PNG_dashboards_creation
- For PNG dashboards creation refer
bot_heart_beat_creation
- As part of
hard sunrise, we need to create thebot_heart_beatfor a brand, which we deleted ashard sunsetprocess. - Login to the grafana
- You can see the folder
chatbotas below - Get into the chatbot folder, you will find the dashboards like this
- Scroll down to the page, you can we see the configured alarms, as shown below.
- Duplicate the existing folder.
- Select any brand and click on it.
- select
moreand click onDuplicatethe brand.
- Now, you need to modify the values according to the required brand.
- After duplicating the brand, click on the
editoption. It will prompt a page for editing the values.
- Update the query as follows.
- Change the brand names as per the requirement.
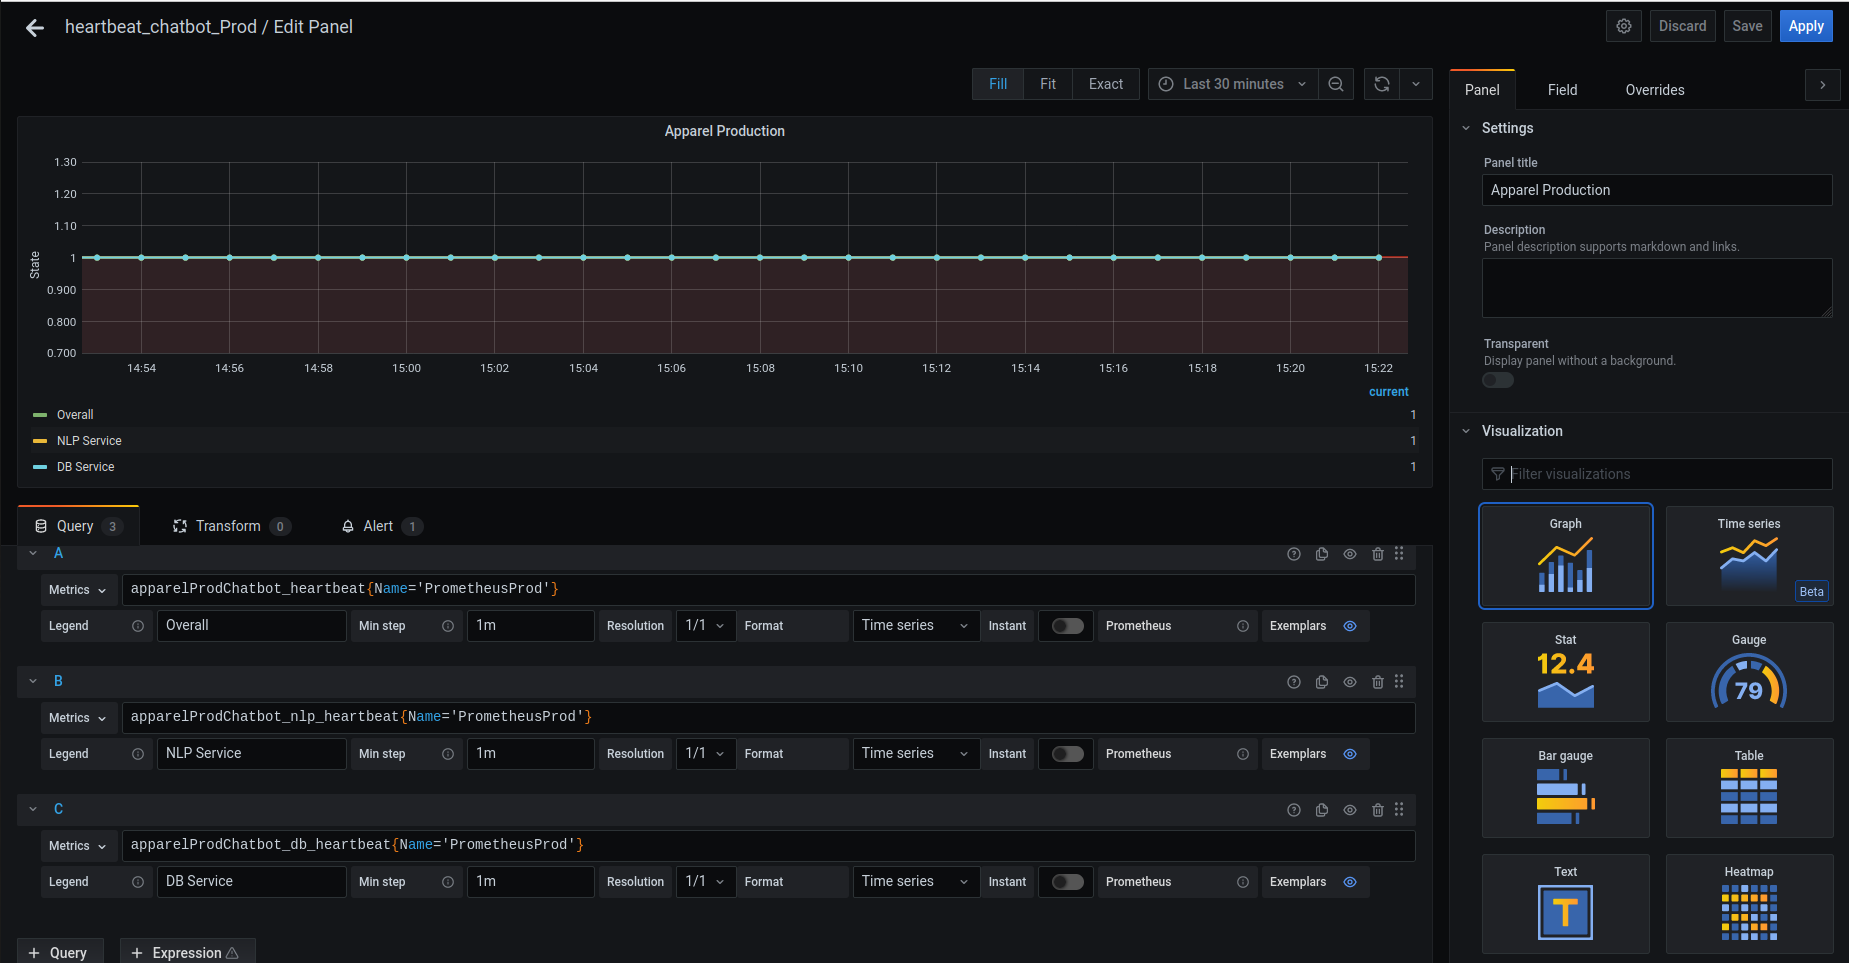
- After updating all values, click on the
Apply. - Finally, save the dashboard.
multi_stack
- Multistack contains the
Utility,NLP,Webapp,dBservers.
soft_sunrise
soft sunriserefers to the starting theUtility,NLP,Webapp,dBservers which are stopped through sunset operation along with the backup data.In multistack we have the
WebappNLPUtilityDBservers.You will find the brand Folder in the Archived folder in the s3 location
s3://oriservedemos/Archive/Move this brandFolder to the
s3://oriservedemos/- Let the brandName in this doc be
bajaj-thai
- Let the brandName in this doc be
Now, the location of brand folder would be
S3://oriservedemos/bajaj-thai/You will find the all files related to
bajaj-thaiStart the Instances
Utility,DBthat are stopped during the sunset operation.For Webapp and NLP, update the autoscaling configuration with Desired,minimum and maximum capacity as Desired values. So that, it will automatically spawn the respective instances.
Update the loadbalancer
DNS nameas the respective Domain name Listeners.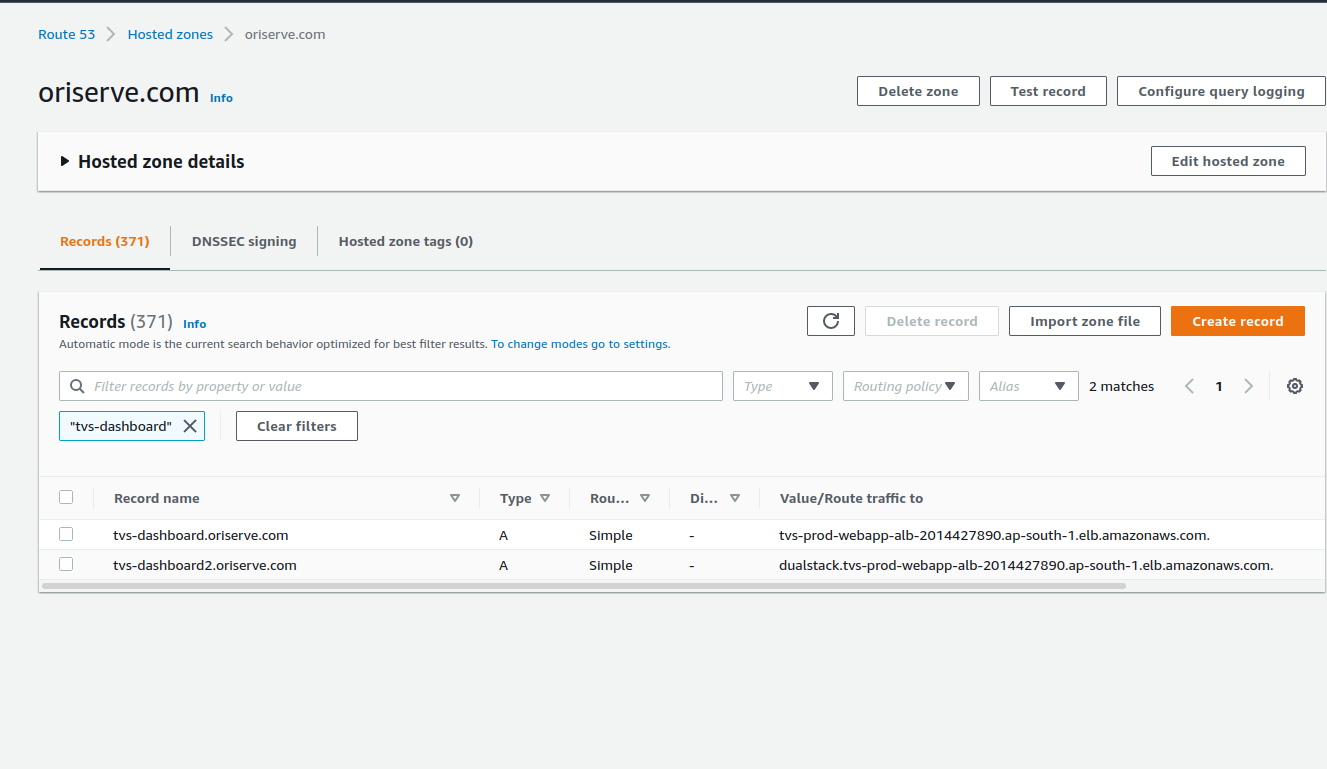
After Creating the stack, perform these actions.
DomainNames
- brandName-dashboard.oriserve.com
tvs-dashboard.oriserve.com
- brandName.oriserver.com
tvs.oriserve.com
- brandName-ai.oriserve.com
tvs-ai.oriserve.com
- brandName-dashboard2.oriserve.com (Confirm with the DevOpsTeam)
tvs-dashboard2.oriserve.com
JENKINS_JOBS_RETRIEVAL
We have configured the jenkins_job to create the new jenkins_jobs.
Login to the Jenkins.
Check for view
IaaSthen go theIaaS-->IaaS_utilities-->IaaS_create_jenkins_jobs
Take above image as reference and provide the necessary details as per your requirement.
jobBranchName: This is our main branch, which is used to pull the collection.jenkinsUrl: Based on the jenkins which is used in the region choose the value.- For mumbai :
https://jenkins.oriserve.com - For ireland :
https://jenkins-ireland.oriserve.com - For N.Virginia :
https://jenkins-nvirginia.oriserve.com
- For mumbai :
createOptionalJobs: Check this if you need to create the two separate jobs for Datamigration and NLP models.bucketName: Select the bucket as per your usage.manjeet-test-orifor test_caseoriserve-demosforMumbairegionoriserve-demos-nvirginiaforN.Virginiaregion.
cf_provisionAdster: Check this if you need to create a jobs foradsterdeployments.brandName: Give the brandName you want to create.env: choose the envProdcf_ocsBranch: Choose the ocs branchcf_brandFileBranch: Choose the brandFiles branchcf_oriNlpBranch: Choose the NLP branchcf_chatbotBranch: Choose the chantbot branchcf_dashboardBranch: Choose the dashboard branchcf_dashboard2Branch: Choose the dashboard2 branchcf_adsterBranch: Choose the adster branch.
Get the confirmation from the
DevOps Leadbefore passing the values.After Providing the necessary values, build the job.
PNG DASHBOARD SETUP
- To setup the PNG dashboards, we have configured a job.
- Login to Jenkins,
- Check for the
Iaas-->IaasUtilities-->IaaS_create_png_dashboard - Provide the values as per the stack.
Type of stack:multifor multi stack.jobBranchName: This is the main master branchbrandName: Enter the brandName.env: Prod
bot_heart_beat_retrieval
- For bot_heart_beat_retreival, refer to the bot_heart_beat
hard_sunrise
Hard sunriserefers to the creating the newUtility,NLP,Webapp,dBservers which are terminated through sunset operation along with the backup data.If the stack needs to create through cloudformation, create the stack by passing the desired values.
- For the conformation of the values, contact to the
DevOpsTeam
- For the conformation of the values, contact to the
We have configured the jenkins job for the multistack creation.
Before performing this step, get confirmation from the
DevOpsLead- Login to the jenkins
- check for the view
IaaSthen,IaaS-->multi_stack_deployment. - You will find the
IaaS_trigger_cloud_formation_multi_stack_creationjob. - Pass the required values and start the job.
After creating the stack, Login to the
dBinstance.The entire backup of the previous database is stored in the S3 location.
The location for the s3 location would be,
s3://ori-db-backup/bajaj-thai/Backup/database/Environment/dbName/- Environment would be
Production
- Environment would be
Change the brandName as per the requirement.
Copy the data from ec2
dbBackupfolder to docker container.In hard sunrise, Domain names creation and associating the loadbalancers will be done through cloudformation.
Jenkins_job_creation
We have configured the jenkins_job to create the new jenkins_jobs for a specific brand.
Login to the Jenkins.
Check for view
IaaSthen go theIaaS-->IaaS_utilities-->IaaS_create_jenkins_jobs
Take above image as reference and provide the necessary details as per your requirement.
jobBranchName: This is our main branch, which is used to pull the collection.jenkinsUrl: Based on the jenkins which is used in the region choose the value.- For mumbai :
https://jenkins.oriserve.com - For ireland :
https://jenkins-ireland.oriserve.com - For N.Virginia :
https://jenkins-nvirginia.oriserve.com
- For mumbai :
createOptionalJobs: Check this if you need to create the two separate jobs for Datamigration and NLP models.bucketName: Select the bucket as per your usage.manjeet-test-orifor test_caseoriserve-demosforMumbairegionoriserve-demos-nvirginiaforN.Virginiaregion.
cf_provisionAdster: Check this if you need to create a jobs foradsterdeployments.brandName: Give the brandName you want to create.env: choose the envDev/Uat/Prodcf_ocsBranch: Choose the ocs branchcf_brandFileBranch: Choose the brandFiles branchcf_oriNlpBranch: Choose the NLP branchcf_chatbotBranch: Choose the chantbot branchcf_dashboardBranch: Choose the dashboard branchcf_dashboard2Branch: Choose the dashboard2 branchcf_adsterBranch: Choose the adster branch.
Get the confirmation from the
DevOps Leadbefore passing the values.After Providing the necessary values, build the job.
PNG_DASHBOARD_SETUP
- To setup the PNG dashboards, we have configured a job.
- Login to Jenkins,
- Check for the
Iaas-->IaasUtilities-->IaaS_create_png_dashboard - Provide the values as per the stack.
Type of stack:multifor multi stack.jobBranchName: This is the main master branchbrandName: Enter the brandName.env: Prod
Launch_Template_Retrieval
- We use LaunchTemplates for 2 services.
WebappandNLP
- We need to create the new LaunchTemplate with the same configuration of previous LaunchTemplateData.
- We have taken a backup of LaunchTemplateData and stored in a s3 before it is deleted.
- The s3 location
aws s3 cp LT.json s3://oriserve-demos/brandName/Backup/Environment/Production/LT_Data/oriNlp/LT.jsonaws s3 cp LT.json s3://oriserve-demos/brandName/Backup/Environment/Production/LT_Data/webApp/LT.json
- Connect to the AWS CLI in your local.
- To connect to the AWS CLI refer to this doc
- If you face any issue, while connecting to the CLI, contact to the
DevOpsTeam. - After connecting to the AWS CLI, get the
LT.jsonfile from the above mentioned S3 locations. - Using this
LT.jsonfile, create a new LaunchTemplate by using this command.- WEB APP:
- command :
aws ec2 create-launch-template --launch-template-name brandName-prod-webApp-LT --version-description version1 --launch-template-data file://LT.json
- command :
- NLP:
- commad :
aws ec2 create-launch-template --launch-template-name brandName-prod-AI-LT --version-description version1 --launch-template-data file://LT.json
- commad :
- WEB APP:
Access_management_retrieval
- For
acess_management_retrievalprocess, refer to the, access_management.
bot_beat_beat_creation
- For
bot_beat_creation, refer to the bot_heart_beat.